Backups up your website is crucial for safeguarding your data and ensuring your online presence remains intact in case of any unforeseen issues. cPanel’s Backup Wizard offers an intuitive interface to simplify the backup process, making it accessible even for beginners. In this guide, we’ll explore how to effectively use cPanel’s Backup Wizard to create and manage backups of your hosting website.
Table of Contents
What is cPanel?
cPanel is a popular web hosting control panel that provides a user-friendly interface for managing your website and server settings. It allows users to perform various tasks, such as managing domains, email accounts, databases, and backups, all from one centralized platform.
Why Use Backups?
Backups are essential for several reasons:
- Data Loss Prevention: Accidental deletions, hacking incidents, or server crashes can lead to data loss. Regular backups ensure you can restore your website to a previous state.
- Website Migration: If you plan to move your website to a new host, having a backup makes the migration process smoother.
- Testing and Development: Backups allow developers to test new features without risking the live version of the site.
Accessing the Backup Wizard
To start using the Backup Wizard in cPanel:
- Log in to cPanel: Use your username and password provided by your hosting service.
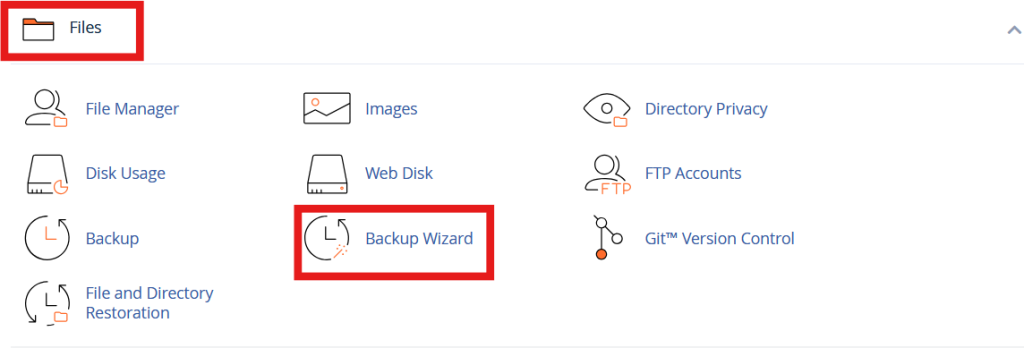
- Locate the Backup Wizard: Once logged in, scroll down to the “Files” section and look for the “Backup Wizard” icon. Click on it to open the wizard.
Understanding the Backup Wizard Interface
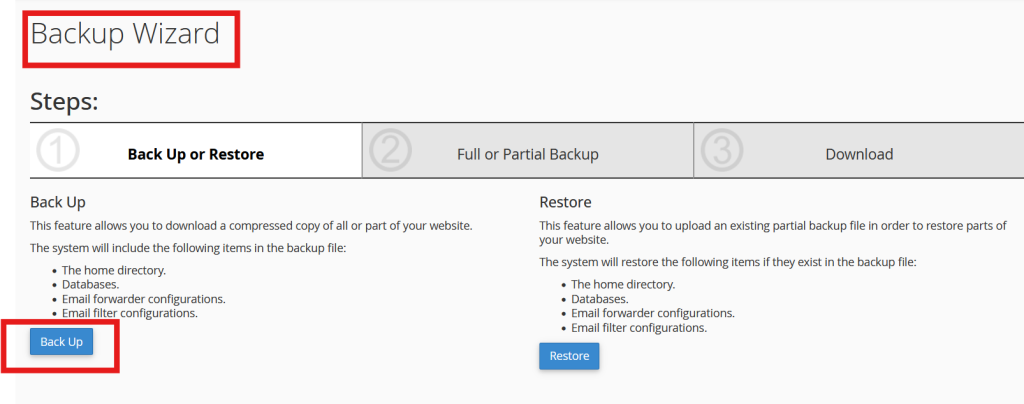
The Backup Wizard consists of several key sections:
- Backup: This option allows you to create a new backup.
- Restore: This option is for restoring your site from an existing backup.
- Backup Documentation: Provides information and guidance on how to use the Backup Wizard effectively.
Creating a Backup
To create a backup, follow these steps:
- Click on “Backup”: This will take you to the backup options.
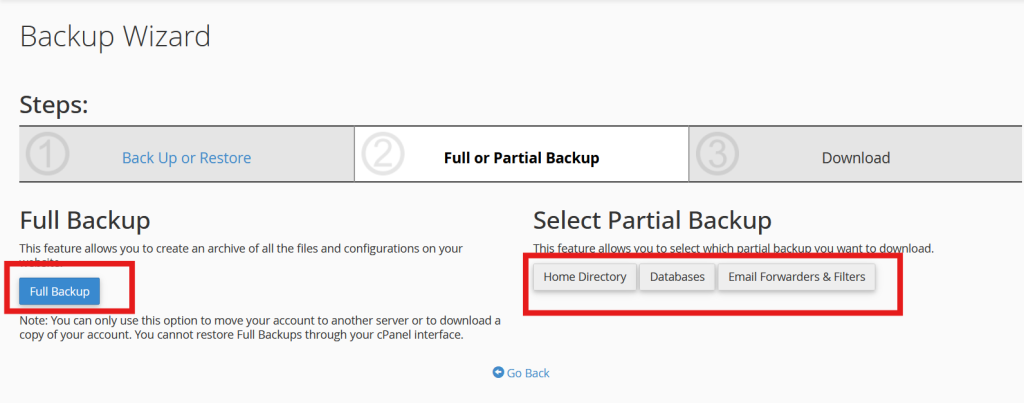
- Select Backup Type:
- Full Backup: This option backs up everything, including files, databases, email forwarders, and filters.
- Partial Backup: If you only want to back up specific components, you can choose to back up your home directory, databases, or email accounts separately.
- Choose Destination:
- You can back up your files locally (to your computer) or remotely (to a remote FTP server). For local backups, select “Download a Full Backup” or the specific component you want.
- Generate Backup: Click on the “Generate Backup” button. Depending on the size of your website, the backup process may take some time. You’ll receive a notification once the backup is complete.
Downloading the Backup
If you selected a local backup, once the backup is complete, you’ll see a link to download it. Click on the link to save the backup file to your computer. Make sure to store it in a secure location.
Restoring from a Backup
If you need to restore your website from a backup, follow these steps:
- Click on “Restore”: This will present you with options for restoring different components of your site.
- Select Backup File:
- If restoring a full backup, you’ll need to upload the backup file you downloaded earlier. For partial restores, choose the specific component you want to restore.
- Upload the Backup File: Follow the prompts to upload the backup file from your computer.
- Confirm Restore: After uploading, confirm that you want to restore the selected files. This process may overwrite existing data, so ensure that you are restoring the correct backup.
Best Practices for Backups
- Schedule Regular Backups: Depending on how often you update your site, schedule daily, weekly, or monthly backups.
- Store Backups in Multiple Locations: Keep copies on your server and local machine, or use cloud storage for added safety.
- Test Your Backups: Periodically check that your backups can be restored properly to ensure they’re functioning as intended.
- Stay Informed: Keep up to date with any changes in your web hosting service’s backup policies or features.
Conclusion
Using cPanel’s Backup Wizard is a straightforward and effective way to manage your website backups. By following the steps outlined above, you can safeguard your data, simplify the restoration process, and maintain peace of mind knowing that your website is protected. Regular backups are an integral part of any website hosting and management strategy, and the Backup Wizard makes this essential task easy for users of all skill levels.