Creating a site or domain redirect in cPanel hosting is a straightforward process that allows you to direct visitors from one domain or URL to another. This can be useful for various reasons domain redirect , such as guiding users from an old domain to a new one, managing changes in URL structure, or consolidating multiple websites. Here’s a step-by-step guide to setting up a redirect in cPanel.
Table of Contents
1. Log in to Your cPanel Account
To begin for domain redirect, you need to access your cPanel account. Domain redirect is typically done through a URL provided by your web hosting provider, often in the format http://yourdomain.com/cpanel or http://cpanel.yourdomain.com. Enter your username and password to log in.
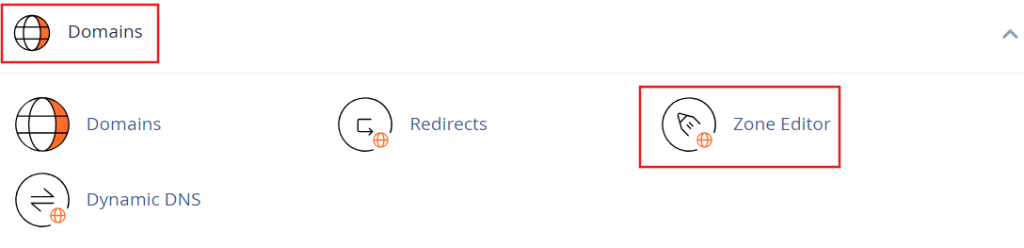
2. Navigate to the Redirects Tool
Once you’re logged into cPanel, locate the “Domains” section. Here, you will find several domain-related tools. Click on “Redirects”. This tool is used to create and manage redirects for your domains.
3. Choose the Redirect Type
You’ll be presented with options to set up different types of redirects. There are two primary types:
- Permanent (301): This redirect informs browsers and search engines that the URL has permanently moved to a new location. It is the recommended option for SEO purposes if you’re moving to a new domain or URL permanently.
- Temporary (302): This redirect indicates that the URL has been temporarily moved. It is useful for temporary changes or maintenance purposes but does not pass the SEO value from the old URL to the new one.
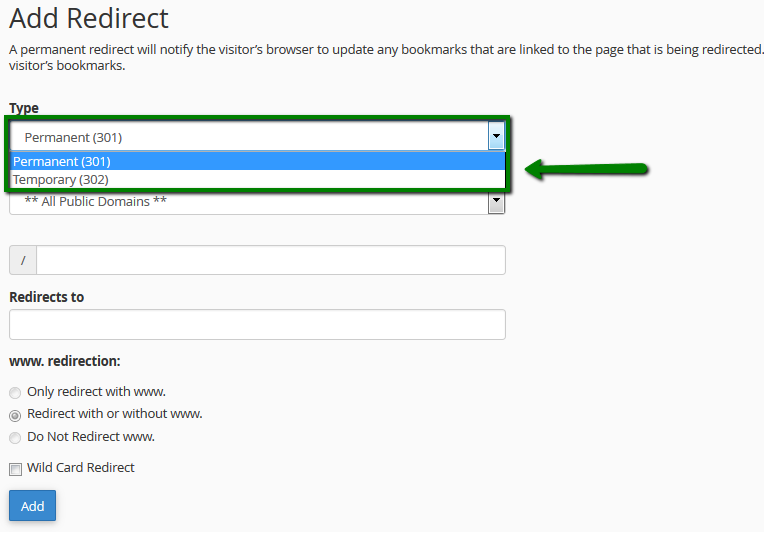
Select the type of redirect you wish to create. For most cases domain redirect, especially if you’re moving to a new domain permanently, 301 is the preferred choice.
4. Set Up the Redirect
In the “Add Redirect” section, you will need to specify several details:
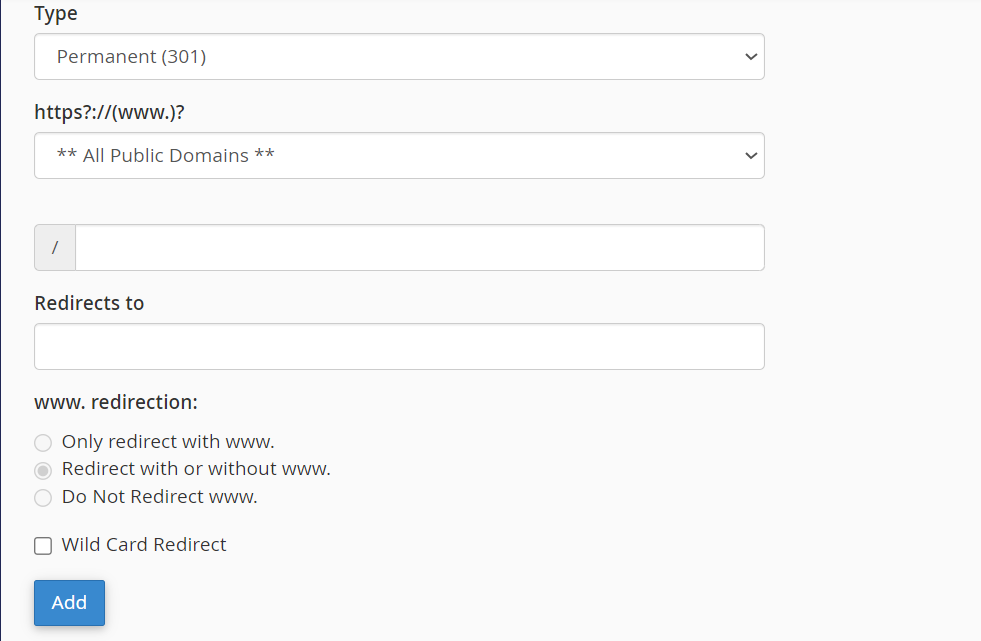
- Type: Select the type of redirect (301 or 302) from the dropdown menu.
- http://(www.)? Select the domain you want to redirect from the dropdown list. If you want to set up a redirect for a specific folder or subdomain, you can choose that here. For a full domain redirect, select the main domain.
- Redirects to: Enter the URL where you want visitors to be redirected. This can be a different domain, subdomain, or a specific page on the same or different domain. For example, if you want to redirect
http://oldsite.comtohttp://newsite.com, you would enterhttp://newsite.comhere. - www. redirection: Choose how you want the redirection to handle ‘www’ versus non-‘www’ versions of your domain. You have options like “Redirect with or without www,” “Redirect with www,” or “Redirect without www.” Choose the one that fits your needs.
- Wild Card Redirect: If you want to redirect all pages from the old domain to the new domain while maintaining the URL path (e.g.,
http://oldsite.com/page1tohttp://newsite.com/page1), check the “Wild Card Redirect” box. This ensures that any request tohttp://oldsite.com/anythingis redirected tohttp://newsite.com/anything
5. Add the Redirect
After filling in the necessary details, click on the “Add” button to create the redirect. cPanel will process the request and set up the redirect according to the specifications you provided.
6. Verify the Redirect
To ensure that your redirect is working correctly, test it by entering the old URL into your browser. You should be redirected to the new URL as specified. It’s a good practice to test various URLs within the old domain to confirm that all intended redirects are functioning properly.
7. Managing Redirects
If you need to modify or delete a redirect, return to the “Redirects” section in cPanel. Here, you’ll see a list of existing redirects. You can edit or remove them as needed. To delete a redirect, simply click the “Delete” link next to the redirect you want to remove.
8. Considerations and Best Practices
- SEO Impact: For permanent moves, use 301 redirects to pass SEO value to the new URL. This ensures that search engines and users are directed to the new location, and the old URL’s ranking benefits are transferred.
- Redirect Loops: Avoid creating redirect loops, where URL A redirects to URL B, which redirects back to URL A. This can cause infinite loops and prevent users from reaching the intended destination.
- Testing: Regularly test your redirects to ensure they’re functioning as expected. This is especially important after making changes to your site or domain structure.
Conclusion
Setting up a domain or site redirect in cPanel is an effective way to manage URL changes and direct traffic to the appropriate location. By following the steps outlined above, you can create, manage, and verify redirects to ensure a smooth transition for your website visitors. Whether you’re moving to a new domain or reorganizing your site’s URL structure, cPanel’s redirect tool provides a user-friendly solution for maintaining a seamless user experience.